Managing humidity in an old house
I live in an old stone house that was originally built in 1732 as a stable. It was converted to residential in 1978 and actually won awards, although I’m not entirely sure how having learned about stone house conservation over the past few years.
When we first looked at buying this house, we were acutely aware that we wanted a good survey because of our lack of knowledge of old houses; I work in IT security and, whilst I might be able to teach you how to generate a threat model, I certainly didn’t know a lot about building and conservation (and am still absolutely no expert). However, we loved the look of the house and it suited our needs perfectly so we wanted an expert to come, pour over the intricacies and tell us about any issues that we might be taking on. Therefore we picked the Rolls-Royce of surveys, the RICS Building Survey, which RICS tell us is their, “most detailed and comprehensive property survey that RICS offers ideal for larger or older properties or if you’re planning major works”. RICS also say that it provides, “a structural survey of the property including, a description of visible defects and potential problems caused by hidden flaws”. Sounds perfect, right!
Not so. The survey spotted a few minor issues but all seemed perfectly reasonable so we went ahead with the purchase as planned.
Skip ahead a few years and this is a list of the things we’ve found that the survey missed:
- The survey suggested that some localised patch pointing was required. It turns out that the sandstone house had been pointed using cement based mortar which is wholly unsuitable for soft sandstone and is causing the stone to spall, flake and crumble. Over time, the stone will degrade to such a bad extent it will probably need rebuilding! In the first 300 years of its life, the house was perfectly sound but 40 years of cement has done significant damage and may only have another 40 years left in it without significant intervention.
- The house isn’t specifically damp and there are no major signs of damp, but we spotted some salts being deposited on some of the exposed stonework in the living room and on the associated opposite side in the garage; there’s also a musty smell that appears in the same locations after heavy rainfall. This can [probably] be attributed to the fact that the levels to the front of the house are higher than at the back causing rainwater to effectively flow underneath the house. Because of that difference in ground levels, the water appears to be penetrating through the exposed stone. As a result, the internal humidity does seem to sit between 60-70%, which is on the border of causing issues, but does spike when it rains.
- The fascias and gutters, whilst fairly new, are in pretty bad shape. A lot of them don’t drain towards the downpipe and instead overflow onto the stone.
- Solar panels were installed by the previous owner about 10 years ago but were poorly installed. Lots of roof tiles were cracked in the process and simply siliconed back in place. Having kept the water out for almost 10 years, the silicone has decided to call it a day and we now have obvious water patches on the bedroom ceilings after heavy rainfall.
- An extension that was built about 10 years ago wasn’t done to the highest quality and, when it rains, smells of damp (although there are no obvious signs of damp). The theory here is that the roof space, for which there is no access, has poor ventilation and moisture condenses on the felt but we’ve also found some of the flashing has been installed badly and is now loose which may be part of the issue.
So not great results from the survey which is disappointing on a number of levels, not least because it cost us a bucket of money in the first place but the issues that it didn’t highlight will cost us significantly more to fix in the longer term. As an example, repointing the old part of the house using traditional methods is likely to cost more than £10K.
But this post isn’t about bashing the survey. Maybe the surveyors don’t know the intricacies of old stone houses and we would have been better employing a surveyor who was a specialist in this field instead, of which there are a few, but hindsight is a wonderful thing! Instead, this post is an introduction to why we need to do work to try and rectify the house to put it back to its original state in which it stood for 300 years without issue all while trying not to break the bank; I’ll cover some of those in subsequent posts as they are quite unique.
When this house was converted from a stable to residential in 1978, building regs weren’t up to todays standards and building methods were significantly less advanced. As a result, the house leaked a lot of air which was bad from an efficiency perspective but great from a ventilation, and therefore humidity control, perspective.
Over the past forty years, minor, piecemeal attempts have been made to install efficiency products. If you enter the loft by any means other than by helicopter winch, you’re likely to drown in fibreglass insulation which appears to be about 1m in depth. Some of the walls have been wallpapered, but, peeling that back, have been backed by sheets of polystyrene, that horrible stuff that you get in packaging which ends up stuck all over the place and is impossible to clean up. Luckily, it appears that the previous owner didn’t quite go as far as installing cavity wall insulation although there are some indications that this was looked in to and given serious consideration. I say ’luckily’ there because the walls in this house are >600mm thick and made up of an outer skin of sand stone and an inner skin of breeze block. The cavity is filled with rubble and earth up to window height and needs to be kept clear otherwise in order that penetrating moisture can escape (sandstone is a porous material). Filling the cavity with chopped up newspaper or polystyrene balls would have been even more disastrous.
I previously mentioned that we had a reasonably high level of relative humidity (60-70%) which spiked after heavy rainfall and would reach 80-90% in winter (which is the opposite of what should happen, but more on that later). The solution to this is multi faceted but, in this post, I’ll focus on internal ventilation to control humidity.
Internal humidity⌗
There are lots of articles out there which talk about the main reasons for damp in houses. A lot of them attribute it to rising damp - moisture being drawn up from the foundations and into the walls - something which is questioned by some in the industry as being a key cause of internal damp compared to some of the (what should be) more obvious reasons.
Some others, to a much lesser extent, attribute it to problems with things like ground levels, poor drainage, broken gutters/downpipes and humidity related to a lack of internal ventilation. That last point is super interesting and is very well described in a Medium article by Peter Wurmsdobler that I came across on the subject and which is well worth a read; the key summary being:
If you want to maintain a dry indoors climate, allow 10 minutes airing for a complete air exchange with all windows open at least in the early morning and late evening (when the outside temperature is lowest and the water content in the air at the absolute minimum), and also after every cooking session, bath or shower. Even though it may sound counter-intuitive, the energy you loose is not much compared to the quality of life you gain. In addition, the decreased relative humidity in the house results in a smaller thermal capacity of the indoors air which is easier to heat. In due course you will have no issues with mould any more.
It would of course be better to have an HVAC system, with controlled air circulation and heat recovery. Retrofitting such as system in an old house, however, would be difficult and costly. Easier it is just to keep airing.
In Germany they call this concept Stosslüften, which translates to shock ventilation, as it clears the house of all its stale humid air in one quick blast and drawing in cold dry air in its place ready to be heated by the central heating.
Peter’s article is excellent and highlights the erroneous focus on Relative Humidity (RH) without its relative component: temperature. For example, the RH in the house right now (mid October) is as follows:
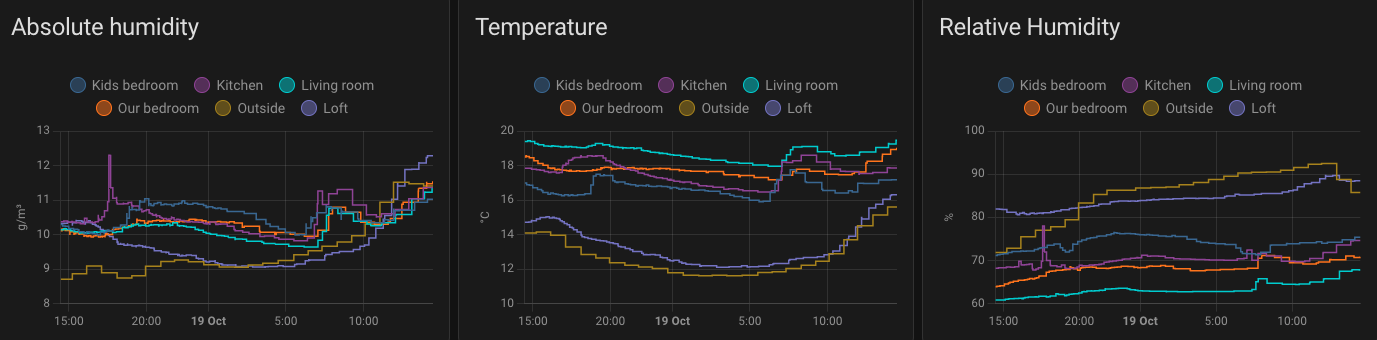
There is quite a variation between the rooms but for good reason: that the temperature in each of the different rooms has a high degree of variation also.
A much better way to look at humidity is via Absolute Humidity (AH) and, looking at the screen grab of AH, shows that there is significantly less variation, especially overnight. There is more variation during the day because we’re cooking, cleaning, bathing and doing all the things that produce huge amounts of internal humidity but it very much stabilises overnight when all of those activities stop (breathing aside).
The things that cause internal humidity which aren’t human related in our house includes:
- Ground levels. We’re at a low point on the street so water naturally falls towards our house.
- Poor drainage. Hand in hand with (1), any water that does fall towards the house is uncontrolled and ends up sitting against the wall.
- Downpipes and gutters. Our downpipes don’t feed in to the drains, they hover above. If it rains and is windy, the water doesn’t fall into the drain but gets blown onto the nearby ground making (2) even worse.
- Damaged roof tiles. We definitely suffer from this, primarily because of the poor quality of workmanship by the solar panel installers around ten years ago. Having had a roofer look at the problem, we found damaged roof tiles that had been siliconed back into place and where, after ten years, the silicon had given up.
- Weather (and/or climate change). Impacting all of the points above, the past 18 months have seen an enormous increase in the amount of local rainfall that we’ve seen which has an obvious impact.
Ventilation⌗
I’m not as disciplined as Peter and would never remember to open all of the windows twice a day. Plus, we’d probably have a toddler jumping out of an open window if it wasn’t supervised so best to avoid that approach.
Peter also touches on Mechanical Ventilation with Heat Recovery (MVHR) which requires a huge amount of retrofitting into an old property as it needs input and exhaust vents fitting in every room and routing back to a central unit. That’s not going to happen in this house as I don’t earn enough to justify that kind of work.
However, there is a type of mechanical ventilation on the market which gets us half way there. It’s not specifically aimed at the regular residential homeowner, from reading the marketing material, more at landlords looking to address the same problem described by Peter and therefore focusses on trying to save money through a very rudimentary form of heat recovery (which definitely isn’t the case). This type of system is called a Positive Input Ventilation (PIV) unit and is a huge fan installed in the loft which blows air into a central point of the house, such as the landing. By pushing in a huge amount of air, the internal pressure is effectively increased forcing the incumbent air to find ways to leave the building via natural leakage points (trickle vents, letter boxes, poor seals around doors and windows, etc). This helps to provide the same result as Peter’s opening of all the windows, just on a continual basis as opposed to two huge blasts per day. The other benefit is that it has two huge F7 grade filters on it meaning that the air that you bring in to the house is filtered of things like PM2.5 smoke particles and other nasties that humanity pumps into the air.
I tried to weigh up the pro’s and con’s of this solution as, at first sight, it seemed like an interesting option.
Pro’s:
- Regularly circulates the internal air and is designed to do so at a rate that meets building regulations i.e. a whole house air change every 3 hours (or 8 complete air changes per day).
- Pushes out humid air in place of air from the loft which should be relatively similar in humidity to that from outside.
- Pre-heats the air by a few degrees so that the impact on internal heating is not so drastic.
- Filters the air so that you always have clean incoming air that is free of nasties.
- Is fit and forget; you install it in the loft, switch it on and shouldn’t have to think about it (or humidity again).
- It helps to keep the loft ventilated and free from condensation by regularly cycling the air up there too.
Con’s:
- Loft air is not always fresh if there is poor ventilation in the eaves. If this is the case, the air will probably be very humid in the loft and will push very humid air into the house.
- It can only heat the air by around 4 degrees so in the depths of winter where it’s -4 outside you’ll have air coming in that might only be 0 degrees and is pretty chilly. The central point where the air comes in to the house tends to get pretty chilly in winter.
- Warming the air uses electricity and the cost/benefit relationship isn’t there to justify it, especially given the price of electricity compared to gas.
- Pushing in that much cool air in winter means that your heating has to work harder so your gas bills will jump a touch (although this is probably no different to the scenario that Peter describes).
- You need good internal circulation which means you need to keep your doors open or have them half mast.
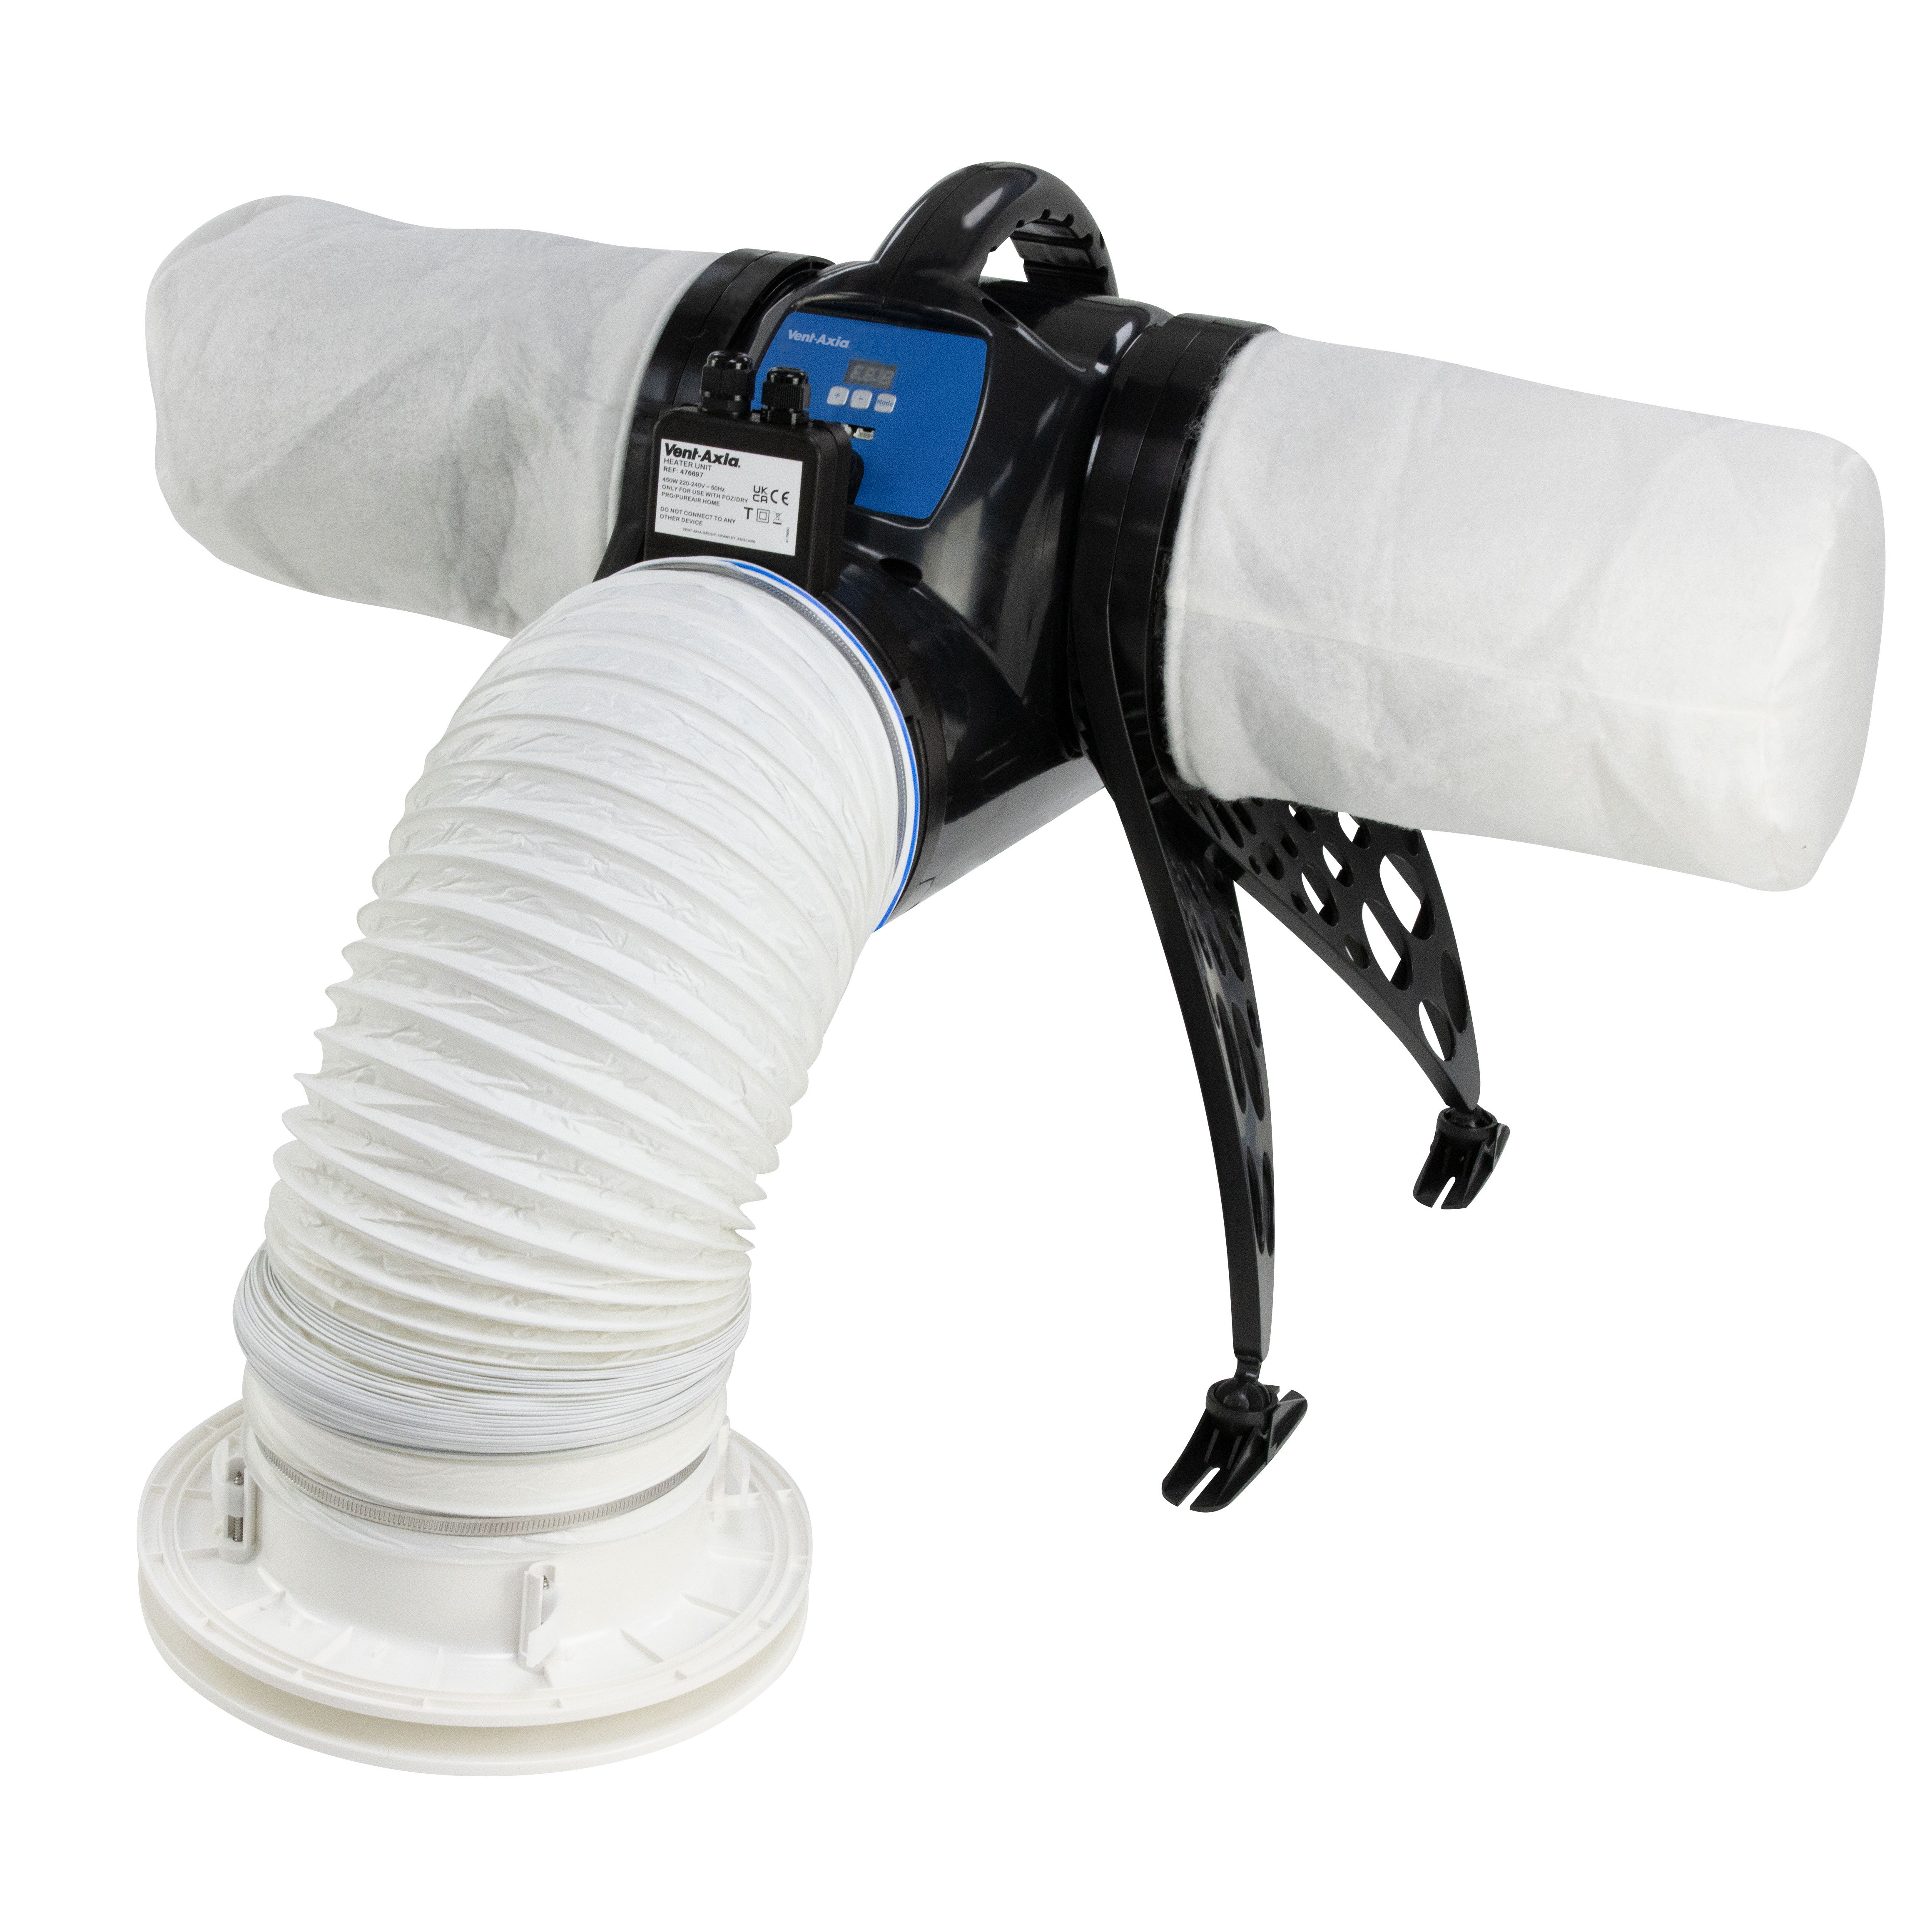
On balance, the pro’s seem to outweigh the con’s so I jumped in and bought a Vent Axia PIV unit with attached heater. It’s been installed for a good few yeas and generally lives up to the trade off mentioned above. Yes, the gas bills are higher in winter and yes, the landing is flipping cold, but look back to the charts above at our RH and AH values and you’ll see just how low the level of moisture is in the house for this time of year. Whereas in previous winters we would wake up and have to mop the windows clear of condensation, we now wake up to completely clear windows. In summer, when the levels of humidity are high(ish) in the UK and it’s warm, the house is warm and humid too, but then it would be anyway as we’d have the windows and doors open all day in summer.
However, I have learned the following lessons over the years:
- I don’t run it all the time - I run it at select times of day as per the next section.
- I don’t run it when our log burner is on (or our neighbours).
- Because I don’t run it all the time, I run it at full speed (~60L/s).
- I no longer use the heater element and have physically disconnected it as it’s just not worth using.
Smart Ventilation Control⌗
We’re constantly being told about Passivhaus techniques to save on the need for burning gas to warm up houses, a concept which I’m completely on board with, but there is always a balance. If I were to insulate my house so that it was 100% sealed, which is completely impossible based on it being an old stable, the air would never change within it and the humidity would keep on going up. Hence I need to change the air a number of times a day but want to do so in a way that is as energy efficient as possible which I achieve using smart home technology.
One of my other posts talks about my smart home technology and that I run a Home Assistant server to control as much of the house as possible. While the Vent Axia PIV unit isn’t smart in any way, it can be controlled on/off by the use of a smart plug, so that’s what I’ve done, and that lets me balance the use of ventilation with the need to heat that fresh air. What I’ve learned over the years is that I only want the PIV unit running when the gas central heating isn’t on so I have a couple of scripts that make sure it runs at specific times such as:
- When I know the heating won’t be on e.g. at night.
- Not at times that our own log burner will be burning (the morning) or our neighbours (the evening)) as I don’t want to suck in smoke.
- When the heating is in ‘away’ mode (as the heating won’t be on then either).
- For a couple of hours in the morning to clear the humidity from the bedrooms.
That adds up to some complicated logic which currently runs under two Home Assistant automations (and has dependencies on many more). The first is time based so that the PIV runs at night and again in the morning.
Secondly, I have the ability to control the PIV unit so that it operates when heating away mode is active, which means that our phones are away or I’m working from home and only in the office, is managed by a second automation and actually works pretty well; the house might generally be cool when I’m working from home but my office is snug and warm thanks to the Drayton Wiser smart TRV focussing the heating to that room only.
The future⌗
As Peter mentioned, my ideal would be an air based ventilation system throughout the house that both heated and cooled depending on the need in any particular room. However, retrofitting such a system in to our house would be hugely disruptive and expensive so it’s one for further down the line when/if we have some spare cash and/or need to replace the gas central heating system.
In the meantime, the setup of gas combination boiler, Drayton Wiser smart TRVs for invididual room control and the PIV for ventilation are a happy middle ground that I’m fine to live with.